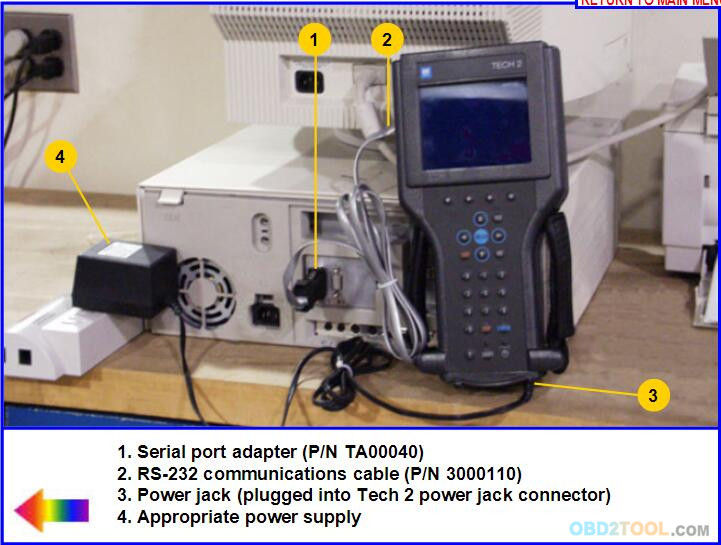
Suivez les étapes ci-dessous et reportez-vous à l'image suivante, qui
illustre la connexion GM Tech2 Scanner typique à un terminal d'ordinateur.
 1. Branchez l'adaptateur de port série (P / N TA00040) sur le port
série marqué "A" ou "1" à l'arrière du terminal de l'ordinateur ou sur
le port USB à l'aide de l'adaptateur série USB.
1. Branchez l'adaptateur de port série (P / N TA00040) sur le port
série marqué "A" ou "1" à l'arrière du terminal de l'ordinateur ou sur
le port USB à l'aide de l'adaptateur série USB.
2. Branchez le câble RS-232 du Tech 2 dans l'adaptateur de port série / port USB et branchez l'alimentation appropriée.
3. Une fois que le Tech 2 est sous tension et que le bouton [PWR] est pressé, l'écran de démarrage Tech 2devrait apparaître sur l'écran Tech II Scanner.
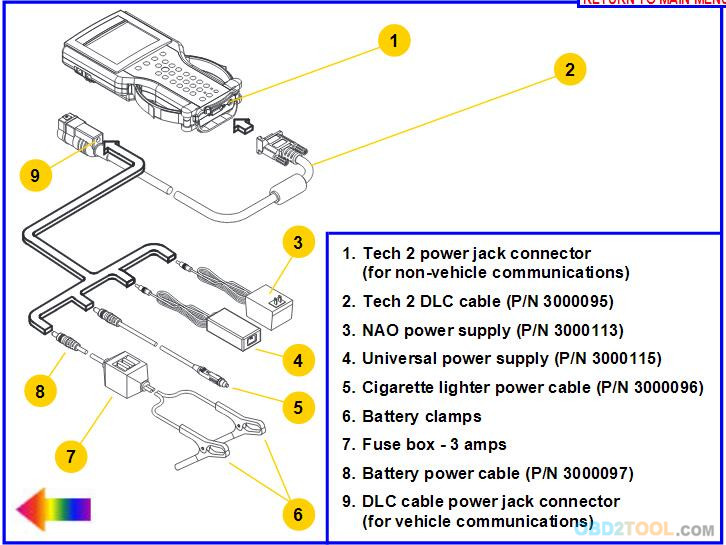
 AlimentationsAllumez le Tech 2 en utilisant soit:* Le connecteur de la prise d'alimentation au bas de l'unité Tech 2, ou* Le connecteur du câble d'alimentation du câble DLC derrière la zone où sont connectés les différents adaptateurs DLC.
5-3
Pour les communications hors véhicule, connectez la source d'alimentation à l'un ou l'autre emplacement.
Pour les communications du véhicule, connectez la source d'alimentation au connecteur de la prise d'alimentation du câble DLC uniquement. Une mise à la terre correcte peut ne pas être présente si la source d'alimentation est connectée directement à Tech 2.
Lorsque le Tech 2 est connecté au DLC d'un véhicule approprié, la batterie du véhicule fournit l'énergie.
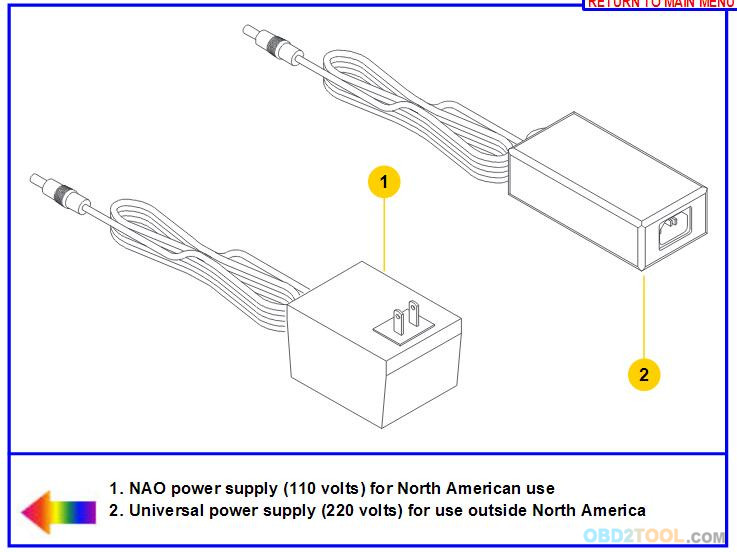
Lorsque le Tech 2 n'est pas connecté au DLC du véhicule, le connecteur de la prise d'alimentation du câble DLC est alimenté par:* Câble d'alimentation allume-cigare* Câble d'alimentation de batterie* NAO ou alimentation universelle
 Si
le DLC et la source d'alimentation externe sont tous deux connectés, la
connexion de la prise d'alimentation fournit du courant au Tech 2. Dans
ce cas, l'alimentation du connecteur DLC du véhicule est
automatiquement déconnectée de l'alimentation interne Tech 2.
Si
le DLC et la source d'alimentation externe sont tous deux connectés, la
connexion de la prise d'alimentation fournit du courant au Tech 2. Dans
ce cas, l'alimentation du connecteur DLC du véhicule est
automatiquement déconnectée de l'alimentation interne Tech 2.
 1. Branchez l'adaptateur de port série (P / N TA00040) sur le port
série marqué "A" ou "1" à l'arrière du terminal de l'ordinateur ou sur
le port USB à l'aide de l'adaptateur série USB.
1. Branchez l'adaptateur de port série (P / N TA00040) sur le port
série marqué "A" ou "1" à l'arrière du terminal de l'ordinateur ou sur
le port USB à l'aide de l'adaptateur série USB.2. Branchez le câble RS-232 du Tech 2 dans l'adaptateur de port série / port USB et branchez l'alimentation appropriée.
3. Une fois que le Tech 2 est sous tension et que le bouton [PWR] est pressé, l'écran de démarrage Tech 2devrait apparaître sur l'écran Tech II Scanner.
 AlimentationsAllumez le Tech 2 en utilisant soit:* Le connecteur de la prise d'alimentation au bas de l'unité Tech 2, ou* Le connecteur du câble d'alimentation du câble DLC derrière la zone où sont connectés les différents adaptateurs DLC.
5-3
Pour les communications hors véhicule, connectez la source d'alimentation à l'un ou l'autre emplacement.
Pour les communications du véhicule, connectez la source d'alimentation au connecteur de la prise d'alimentation du câble DLC uniquement. Une mise à la terre correcte peut ne pas être présente si la source d'alimentation est connectée directement à Tech 2.
Lorsque le Tech 2 est connecté au DLC d'un véhicule approprié, la batterie du véhicule fournit l'énergie.
Lorsque le Tech 2 n'est pas connecté au DLC du véhicule, le connecteur de la prise d'alimentation du câble DLC est alimenté par:* Câble d'alimentation allume-cigare* Câble d'alimentation de batterie* NAO ou alimentation universelle
 Si
le DLC et la source d'alimentation externe sont tous deux connectés, la
connexion de la prise d'alimentation fournit du courant au Tech 2. Dans
ce cas, l'alimentation du connecteur DLC du véhicule est
automatiquement déconnectée de l'alimentation interne Tech 2.
Si
le DLC et la source d'alimentation externe sont tous deux connectés, la
connexion de la prise d'alimentation fournit du courant au Tech 2. Dans
ce cas, l'alimentation du connecteur DLC du véhicule est
automatiquement déconnectée de l'alimentation interne Tech 2.
Comments
Post a Comment