
How to Remove and Install ECUValve Assemble for Wabco Trailer


This instruction show you guide on how to remove and install ECU/Valve assemble for Wabco Easy-Stop trailer ABS.

How to Remove the ECU/Valve Assembly

1.Release all pressure from the air system.

2.Attach labels to identify all air lines.

3.Disconnect the air lines from the ECU/Valve Assembly.

4.Disconnect the power (or power/diagnostic) cable, additional relay valve cable (if used),and all sensor cables from the ECU/Valve Assembly.

5.Remove the ECU/Valve Assembly from its mounting location:

Bracket-mounted: Loosen and remove thetwo mounting bolts and lock nuts that holdthe assembly to the cross member. Remove the assembly.

Nipple-mounted to Air Tank: Unscrew theassembly from the air tank.

If the assembly being replaced is underwarranty, please return it to the trailer OEM for

How-to-Remove-and-Install-ECUValve-Assemble-for-Wabco-Trailer-1

How to Install the ECU/Valve Assembly

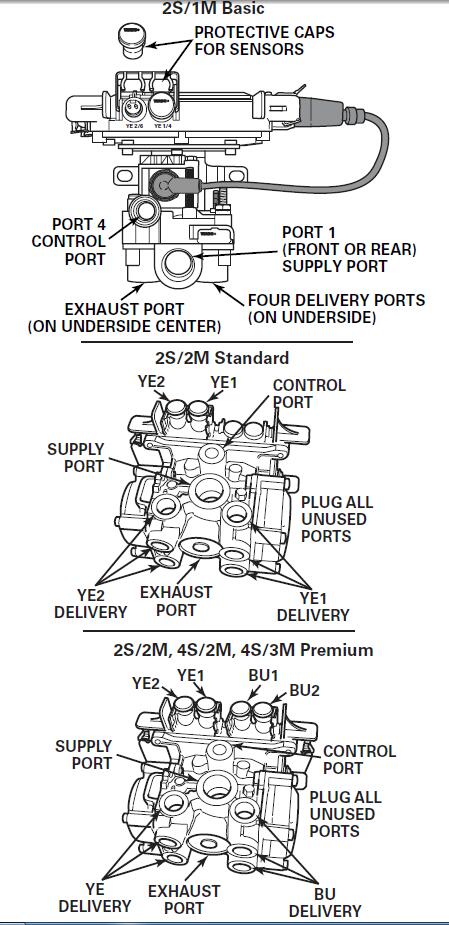
NOTE: The ECU/Valve Assembly is supplied with black protective caps on each sensor connector.

NOTE: When a sensor cable is not plugged into a sensor connector, the black cap must remain on the connector to protect it from dirt and contamination.

CAUTION

You must use a Schedule 80 pipe nipple (3/4-inch NPTF) to nipple mount the ECU/Valve Assembly securely to the air tank to avoid possible serious personal injury and damage to components.

WARNING

You must use a Schedule 80 hex nipple (3/4-inch NPTF) to mount the ECU/single modulator valve assembly securely to the air tank to avoid possible serious personal injury and damage to the component.

1.Use a 3/4-inch Schedule 80 hex nipple to attach ECU/single modulator valve assembly to a reinforced air tank. Do not overtighten.

NOTE: Meritor WABCO does not recommend use of a vise when installing the hex nipple. Use of a vise may cause overclamping. Overclamping may damage the internal components of the ECU/single modulator valve assembly.

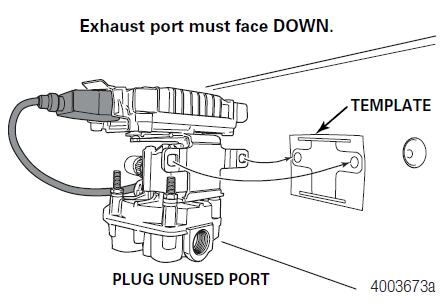
2.Use a 3/4-inch pipe plug to plug unused supply port (Port 1). Apply SAE-standard,DOT-approved Teflon tape or paste-type thread sealant to all pipe threads beyond the first two threads. Pipes with pre-applied thread sealant may also be used.

3.Rotate and tighten the ECU/single modulator valve assembly until the exhaust port faces down and the connection is secure. Use a torque wrench or ratchet with extension at the 3/4-inch pipe plug installed on the front supply port (Port 1).

How-to-Remove-and-Install-ECUValve-Assemble-for-Wabco-Trailer-2

More repair case for Wabco machine,please refer to:WABCO Trouble Repair

If you need WABCO DIAGNOSTIC KIT, please contact us:sales@obd2tool.com

Comments

Popular posts from this blog

How to Solve VW Amarok Caddy 2018+ Remote Not Working After Programming

Here comes the general problem of VW Amarok Caddy etc. 2018+ UDS protocol vehicles: 2019 VW Caddy. I spent a few hours programming the Xhorse key using VVDI2 . Also tried TDB1000. Remote function could not be obtained. Every time the programming failed, the original remote stopped working until I scanned and cleared errors. I expected it to work when the transponder was added (Megamos AES). I can’t access remote learning with any of my tools, nor did vvdi2 let me program the remote. I was wondering if anyone could confirm remote learning with transponders or how to learn it if not. Solution: It is not possible for BH remote controls after 2018 at the latest. You will not get any communication with the central locking remote control customization. You need a dealer key 100% and then learn from ODIS. There is no after-market solution, VAG blocked the remote channel on UDS vehicles 2018+. Had the exact same issues with new caddies. So merchant key and Odis ATM since the c...

How to Install Mercedes Benz DTS Monaco 8.16 Software

  This instruction show you the guide on how to install Mercedes Benz DTS Monaco Software . Preparations: Benz DTS Monaco Software Free Download After finish downoading and extract you will get below files Double click DTS-Setup to start installation Then just click default option to continue Click Finish Copy files in the repalce folder to DTS Monaco installation folder replace C:\Program Files(x86)\Softing\Diagnostic Tool Set 8\8.16\bin Then run “DTS Monacon” icon on desktop,it will show you the HWID and ask you to activate Please sent me your HWID to me(sales@obd2tool.com),we will sent you a activate file and license file When you get the xxx.reg file,doulbe click it to register it to your pc,click yes to add it the registy Run DTS Monaco and select “Administrate and manage DTS projects’ Select “System”–>”Add license” Load the License_0000000000000.bin file i sent you before Now your DTS Monaco have activated successfully! DTS Monaco 8.03.12 Softw...

GM MDI2 Software Tech2win interface

  What is Tech2win? Tech2Win is a Tech2 emulator for GM diagnostics. It allows you to use your J2534 card like a Tech2 on GM vehicles. Tech2Win is an application version of the Tech 2 and CANdi (Control Area Network Diagnostic Interface) module that can be used during automotive road testing, providing a larger display with all functions of the tool GM Tech2 GM Scanner . Tech2Win App provides all Tech 2 features and functionality for Opel, Saab, etc. What can gm tech 2 pc software do? GM Tech 2: This is the GM factory scan tool used in all GM dealers since 1996. Tech 2 will give your shop ‘dealer level’ capabilities on all GM vehicles insured. Scan, pull codes, graph data and have all two-way controls available for all vehicle systems including Powertrain, Body, Chassis, and Network Tech2win Specialized Diagnostic Software. 2. Tech2Win software features: 1. Tech2Win is designed to be used for diagnostic functions (No programming function) 2. Service programming func...